
Now I´m primarily using splines and loftobjects (which initially consists of splines). The loftobject comes with its own UVW mapping system, which follows the path spline, making it a whole lot easier to texture.
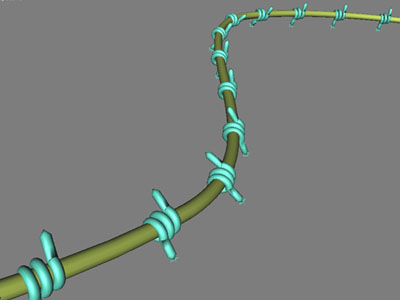
This is what you should end up with...
And this is what you need :

Lets get started.
First up go to create
Done? Good. Now go to the modify panel
Now click the vertex subobject tab
take the first vertex of the helix and drag it away from the helix, and do the same to the last vertex.
This is the path for the loftobject.
Now exit vertex subobject mode (by clicking the tab again) and go back to create->shapes and this time make a circle. Size doesnt matter (riiiight!!) - do try to keep it a reasonable size compared to the helix.
If you´re not familiar with the loftobject, then basically what it does is to make one profile (in this case the circle) follow a path (in this case the helix) and make a mesh solid out of that.
Lets make a loft object :
 Select the Helix and go to create->geometry
 Click get shape and select the circle (since you´re using the helix for path). And presto - a pointy-thingy. Not very pointy though is it? We´ll get to that in s minute. First there´s some settings you need to check in the loft object options. So select the freshly created loftobject, and go to the modify panel. In the options part of the loft object rollout, make your settings as showed here ---------->
Basically you´re just optimizing the loft object to use as few polygons as possible, to avoid dense meshes (as you will need a lot of these to make barbed wire).
Good then - now to make the ends pointy.
Go to the deformations rollout of the loft objects (yes, still in modify mode) - click scale and you´ll get a dialog like the one below...
...except you´ll have a straight line with only two dots placed at 0 and 100 on the line, and at level 100.
To make the extra two dots, click the create point tab (circled with yellow) and set two points similar to where i put mine (circled with blue). Now take the points at 0 and 100 and move them to level 0 (as seen circled with green).
What you´ve just done is make the loft object thinner along the path. Where 0 is the beginning and 100 is the end. In other words - with these new points - you made the pointythingy.....pointy.

 Ok - we have a pointythingy - now we need a line to copy it along (and to function as the actual line).
Once again go to create->shapes and this time make a line - give it three points for starters, and make it curve a bit.
There - now we need to add a million of the pointythingies (well - lets just settle with 25 or so).
We´ll be using the Snapshot Array tool, which copies or instances an object x times along a spline/path.
To do so select the pointythingy loftobject and
go to the motion panel
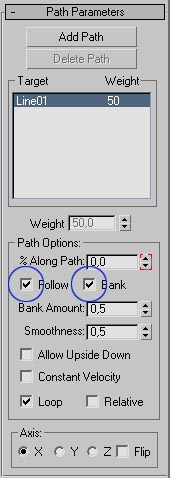 Click add path and select the line you created 2 minutes ago. Be sure to check follow and bank (circled with blue) - this will make the copies of the pointythingy follow the curvature of the line.
 Select the pointythingy loftobject with the path constraint controller recently added, and go to Tools-> Snapshot and you´ll get a similar dialog as this one.----------------------->
Make your settings match these and click ok. Choosing instance over copy, makes changes made to one pointythingy apply to all the others as well.
Now all you need is to select the line, go into the modify panel - check Renderable+Display render mesh, and set a thickness to your liking.
That should pretty much cover it. Add some textures and you should be set.
If you get in trouble, try downloading the Sample MAX5-file.
Copyright © 2003 - Nick Jensen - hatetank.dk - polygonpoop.dk